|
Restore Your iTunes Library from a bum Hard Drive
Problem/Situation
My computer died, my iTunes Library is on that computer.
The library my iPod syncs to, the library with my 18 gigabytes of
organized songs and playlists. My iPod desperately needs to be synced, it
has been about 3 months. I have a temporary computer to use for syncing my
iPod and adding new files to the collection.
Required Items
iTunes
iPod
a cold beverage
hard drive with mp3s, iTunes program directory
a working computer with iTunes
external hard drive enclosure
Solution
|
|
Step 01 - Prepare New iTunes

|
Step 02 - Access / Recover
- Remove the Hard Drive from your now dead computer
- Install that Hard Drive into an External Hard Drive Enclosure or
directly into the New computer that you want to put your Library on
- Open up Windows Explorer/My Computer and navigate to the Hard Drive
that has your files
 |
Step 03 - Search and Copy
- Explore that Hard Drive and search for your iTunes Music Library
-
This file is usually found in the My Music/Music
Directory of a Windows User's Documents
:: Vista - C:\Users\%Username%\My
Documents\My Music\iTunes\
:: XP - C:\Documents and Settings\%Username%\Documents\My
Documents\Music\iTunes
-
The file that iTunes uses for its Library is called "iTunes
Music Library.xml" it is an xml file
-
Check the Date modified to see if it is Up-to-date
-
Copy The XML File

Be Sure that you have the correct file. A problem that I
have run into was that I found a library I had saved in my Music directory
and it was not up to date. I wasn't aware that iTunes saves the actual
Library file somewhere, if anyplace in the Documents.. I thought it would
at least be in the program Directory. |
|
Step 04 - Paste and Recover

ignore the file name
-
Find the location of your MP3's (the "physical" files
themselves"
-
Copy those MP3's to a new location on the working
computer, this location can be at your desire
-
Make Note of this New Location
|
Step 05 - Edit the XML
- Back to your Desktop, or place that you pasted the iTunes Music
Library XML file.
- Right-click on the file and click on Edit
- Notepad should now open up

ignore the file name |
Step 06 - Editing the XML
- You can notice how each song in your library is represented in the
XML file
- You must make changes to the "Location" of every song
 |
Step 07 - Notice the Location
- The directory of my old library was "E:\Music\" and my new temporary
directory is "C:\DanielBACKUP\Music\Music"
- the XML file represents the music directory as "file://localhost//E:/Music"
- For Every Song, you must change E:\Music to
C:\DanielBACKUP\Music\Music.. even if you have 8000+ songs
 |
Step 08 - Replace -
- Navigate to the Edit menu
- Click on Replace
 |
Step 09 - Using Replace
- Replace is almost like the Find tool
- It finds a phrase of your choice and replaces it with whatever you
want
- Be sure to type as much as you can
- Using a less specific "Find what" could lead to the replacing of
things you don't want replaced
 |
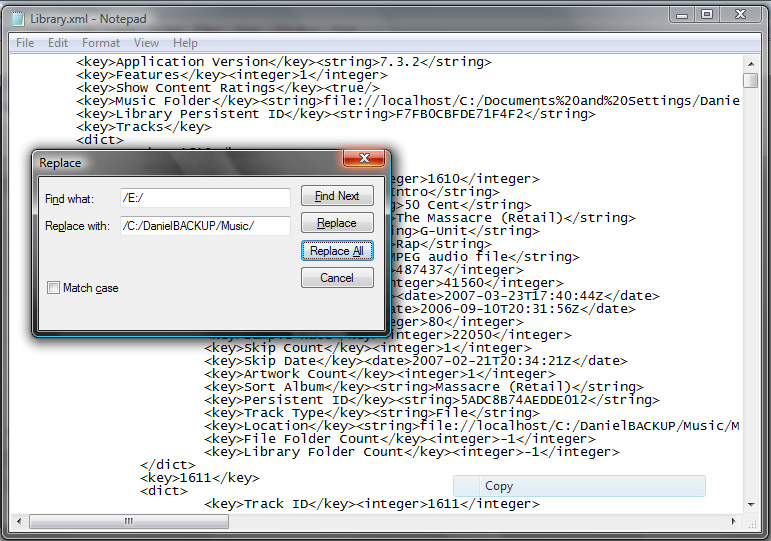
Step 10 - Replace Query
- Type in the former Directory of your MP3s
- Type in the new directory of your MP3s
- If you can, include forward slashes
- If I had only used E:/ everywhere it said "file://localhost/"
it would change to "filC:/DanielBACKUP/Music/"
 |
Step 11 - Replace All
- Click on Replace All
- Check to see if the changes were made
- When Happy, Close Replace
|
| Skip to Step _19__ if this does not apply to you (merge
directories) |
Step 12 - Merge 2 Folders of Music
- My Library consisted of 4 folders; Albums, Audiobooks, Collection
and Unsorted
- Albums consisted of Full Albums of music, Audiobooks had Audiobooks,
Collection has songs with fully proper titles and artists and details,
Unsorted contained songs without proper artist names, title names and
details
- Unsorted has been fixed so it can be merged with Collection, as in
iTunes, the files are all in the same Library
 |
Step 13 - Copy the "physical" MP3's from one
folder to another
- Select the Files of the Unsorted Directory and Drag them to
Collection
 |
| Step 14 - Move Files
 |
| Step 15 - Delete the old, empty, Unsorted
Directory
 |
Step 16 - XML Edit Part 2
- Return to the XML File of the iTunes Library
- Notice the Location, Unsorted must be changed to Collection

 |
Step 17 - Replace Unsorted with Collection
- Navigate to the Replace tool, Edit > Replace
 |
Step 18 - Replace
- Type in the name of the former directory under Find what:
- Type in the name of the new directory under Replace with:
- Ensure you type as much as you can
- Click on Replace
- Double Check to see if what you needed done is done
 |
Step 19 - Save your new XML file
- Close the Replace tool
- Save your XML File
- File > Save ..
- If you want to be extra careful, Save As... a different file name
|
Step 20 - iTunes - import
- Return to iTunes
- Find Import in the File Menu... click on it
 |
Step 21 - Importing into iTunes
- Navigate to the Saved, New iTunes Music Library XML File
- It should be where you saved it, in my case, the Desktop
- Once Selected, Click Open

ignore the file name |
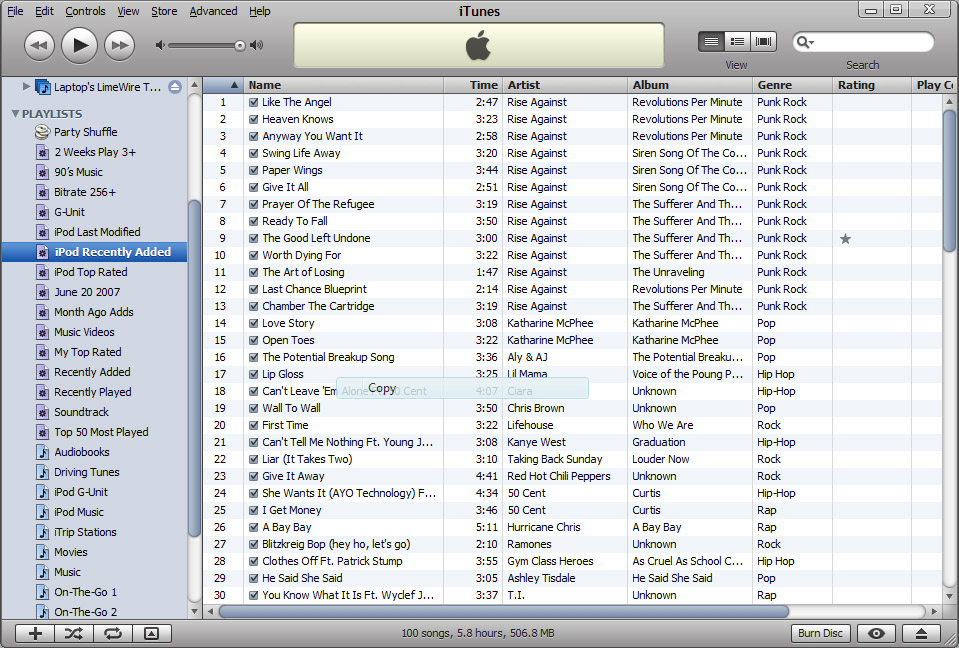
Step 21 - Watch Import
- After you clicked Open, you should see this screen
- When Importing 18 gigabytes of music, this may take a little bit of
time
- The cold beverage can come in handy at this time
 |
Step 21 - iTunes Dialogue - Imported
- You may see this Dialogue if the Files in your Old directory did not
fully contain every single file in your new library
- This is ok though, I didn't need those files anyway, they were
probably WMA files that doesn't work with iTunes and had been converted
 |
Step 22 - iTunes list IMPORTED ( :
☺☻
- Your Library is now Imported --- WHEWWW!!!!!!
- Now it should be Determining Gapless
Playback Information.. This may take a while
- I'm not sure what it actually does, but
I let it do its work. I think it calculates the amount of time it would
take to play all your songs?
 |
Step 23 - iTunes Smartlist - Caution
- Some of the Smartlists in my Library will show a Caution/Attention
Symbol
- This occurs because your Smartlists are added before your Playlists
- When the Smartlist doesn't detect the Playlists that it may contain
and require to function as a Smartlist, you get error messages
- This is an easy Fix
 |
Step 24 - Fixing your Smartlist
- Navigate to your fields that are empty.. Playlist is and select the
Playlist that should be there.. in my case, iPod Music
 |
Step 25 - Smartlist Edited
- Once your Smart Playlist is edited and Complete, Select OK
 |
Step 26 - Rinse and Repeat
- Repeat Step 25 for All your Smartlists that need Attention
 |
Step 27 - Smartlist Complete
- Notice that the Smartlists no longer have Caution/Attention symbols
next to them
- Take note: If your Smartlist collected songs based on when they were
added, be aware that when you imported your library, the date of last
modified and recently added dates are changed. There is a way to hack
this. Instead of Importing, Save your XML file in the location of your
New iTunes XML File. Doing this will allow everything to be EXACTLY the
same as before with your old iTunes Library.
 |
Step 28 - iTunes meet iPod
- If you're like me, your entire iTunes library doesn't Fit on your
iPod.. or you just don't want everything there
- I've created a Playlist that my Entire iPod song list resides in.
These songs are still in my Library.
- My iPod's Smartlists are also based on my iPod Music playlist
- Whatever happens in the folder, it happens to my iPod... unless if
the iPod becomes full, then I need delete stuff.
- Check the Number of Songs you have in the Playlist and Compare it to
the number of Songs on your iPod
- If you're iPod is low on battery, charge it.
- I've had to repeat all the steps that I have done earlier because I
selected the wrong library file, and noticed it because I was missing 4
playlists and the number of songs in my iPod music list was shorter
 |
Step 29 - Meet the New Family
- In the 4ish months of not syncing my iPod, and having access to my
iTunes Library that I have put so much work into, I have additions that
I've been meaning to add to the "%Masterpiece%".
- Before you connect your iPod, you might want to add your New files
and give them a Tweak if you want.. fix file names, genres, Album
Artwork....
|
Step 30 - Long Time No See ( : .... Nice to meet
you
- Connect your iPod to the new computer
- Be sure to use a USB 2.0 Port for high-speed transfers
- Speed Difference is 32 times different. 480megabits per second
versus 12 megabits per second
- It means 7.45 gigabytes could take 32 minutes versus 17 hours
- When you connect your iPod, your files will be deleted but the same
ones will be copied back, so its ok.
- When you see the dialogue "The iPod ...... another iTunes.... Do you
want to erase...." select Cancel

|
Step 31 - Select your original Playlists and
Smartlists
- Click on the Music tab and check Sync music, then select the
playlist of your choice
- Once Selections have been made, click Apply... then Sync (Apply
appears when Sync music is checked)
- iPod Syncing may require a large amount of time depending on how big
your library/iPod library is
 |
| Your iTunes Library is now up to date, your iPod is
synced, and you don't have to spend endless hours redoing what your
Library. |